Risk assessments might sound like a chore, but they’re the backbone of safe and efficient facilities management. Think of them as your facility’s health check – a way to spot potential hazards before they spiral into costly problems.
In this blog, I’ll break down what a risk assessment actually is, what’s required to do it right, and how you can tackle them step-by-step in your Facility Manager role.
Whether you’re a seasoned pro or new to the game, this guide is packed with tips to make the process clearer and more manageable. So let’s dive in!
First up, the basics…
What is a risk assessment?
A risk assessment is a systematic process of identifying hazards and evaluating any associated risks within a workplace, then implementing reasonable control measures to remove or reduce them.
Risk Assessments are a legal requirement under the Management of Health and Safety at Work Regulations 1999. For any business with more than 5 employees, these must be written down.
In order to carry out a facilities management risk assessment, there are 5 steps we need to follow:
Identifying Hazards
So, the first step towards completing a Health and Safety Risk Assessment is to identify potential hazards.
But before we can do this, we need to know what a hazard actually is.
Under UK Health and Safety legislation, a hazard is defined as anything that has the potential to cause harm. Hazards can be divided into 5 categories.
Any of these have the potential to cause harm and each of them, where relevant to your workplace, need to be assessed for the level of risk that they present.
So how do we go about identifying which hazards exist in our workplace?
There are a number of ways we can go about this:
Manufacturer’s Instructions
The instructions provided by manufacturers, including datasheets, information and guidance, will often provide information about any potential hazards associated with an asset.
Observation
A walk round of the site we are assessing will enable us to identify potential hazards such as trailing cables or uneven floor surfaces. We need to make a note of everything we see that could potentially cause an accident.
Staff Consultations
We could ask employees working in the area we are assessing what aspects of the working environment they feel may present a risk.
A classic example here would be undertaking a display screen equipment assessment. Individual staff members will be able to identify both existing and potential issues with their workspace.
Staff consultations can also be useful as a way of identifying psychological hazards such as stress caused by poor management or bullying.
Reviewing Previous Accidents, Incidents and Near Misses
Unlike the previous methods, which are proactive in their approach, this is a more reactive way of identifying hazards. Sometimes, even with a comprehensive approach to identifying and managing workplace risk, we may miss something and an accident or near miss may occur as a result. Although this is not an ideal scenario, it does allow us to identify another hazard and conduct a risk assessment as a result. This can also be a useful method when you begin a new role and need to get a handle on their current level of Health and Safety provisions.
A step in a risky direction…
Assessing Risk
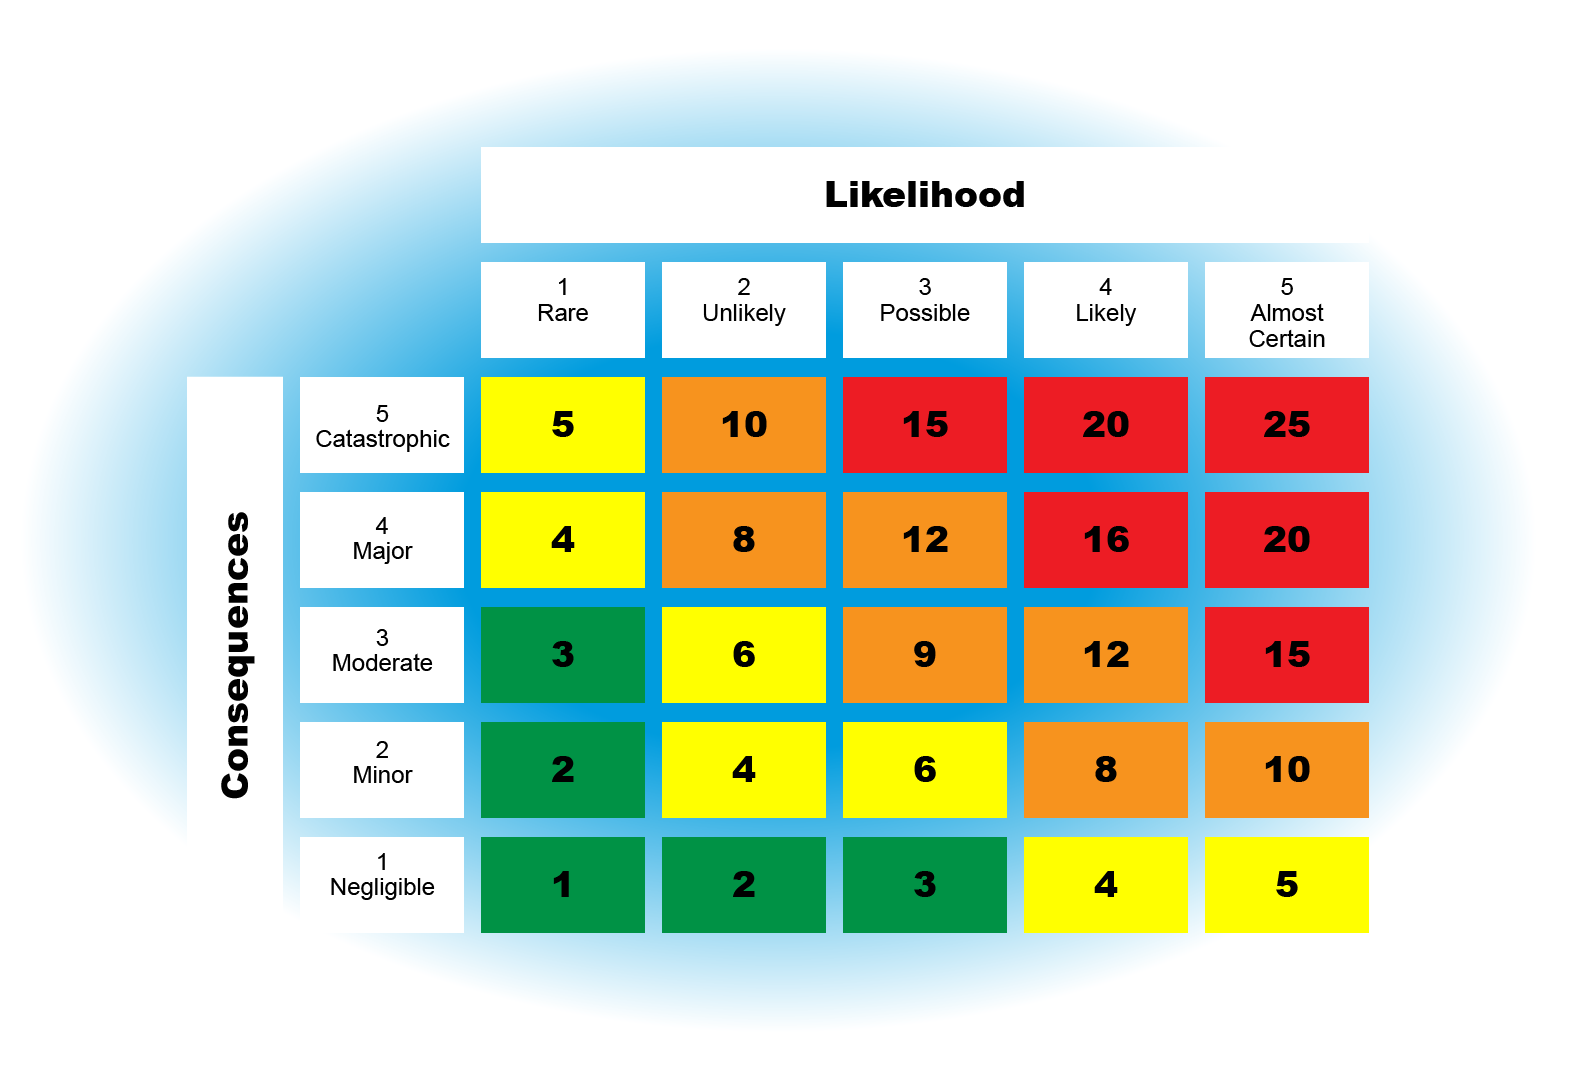
To calculate the level of risk, we have to consider two elements. The likelihood of an event occurring and the consequences if that event did occur.
Each element is given a score from 1 to 5, depending on the likelihood and the consequences.
So if we consider the likelihood first, this is rated on a score of 1 to 5, where 1 would be rare in terms of the likelihood of occurrence and 5 would be almost certain.
For example, if it is very unlikely that an event would occur, we would give the likelihood a score of 1.
We then need to look at the consequences if the event occurred. How severe would they be? Again, this is rated on a score of 1 to 5, where 1 is negligible and 5 would be catastrophic.
We then take these numbers and input them into the Risk Formula. This was in the context of business risk, but the formula is the same for Health and Safety risks.
To recap, the Risk Formula is as follows:
Risk = Likelihood x Consequences/Severity
Using this formula will give you a risk rating, essentially a score that you can use to quantify the level of risk and to work with when implementing control measures to mitigate against the risk.
- Let’s take an example to demonstrate how the calculation works…
- You are undertaking a risk assessment to identify possible risks in the stairwell of your company offices.
- You identify that the stairs themselves present a hazard. People could fall down and injure themselves.
You assess the likelihood of someone falling down the stairs as possible, and give it a score of 3 out of a possible 5. - You then need to assess the potential consequences if someone did fall.
- Given that your stairs are quite steep, the fall has a high possibility of resulting in broken bones, so the consequences of the fall could be quite severe.
- You decide to award a score of 4, or major.
- Using the risk equation above, you would multiply 3 (likelihood) by 4 (severity), giving you a risk rating of 12.
If you look at the risk matrix below, this shows that a score of 12 is medium to high. This means that you need to put controls in place to try and reduce the risk.
Want to find out more?
XenZone is a library of bitesize courses designed specifically for Facilities Managers.
It’s the only one of its kind in the world, offering unlimited access to an ever growing selection of interactive online courses for aspiring FMs.
You can try XenZone out for free today!
Time to take control…
Controlling Risk
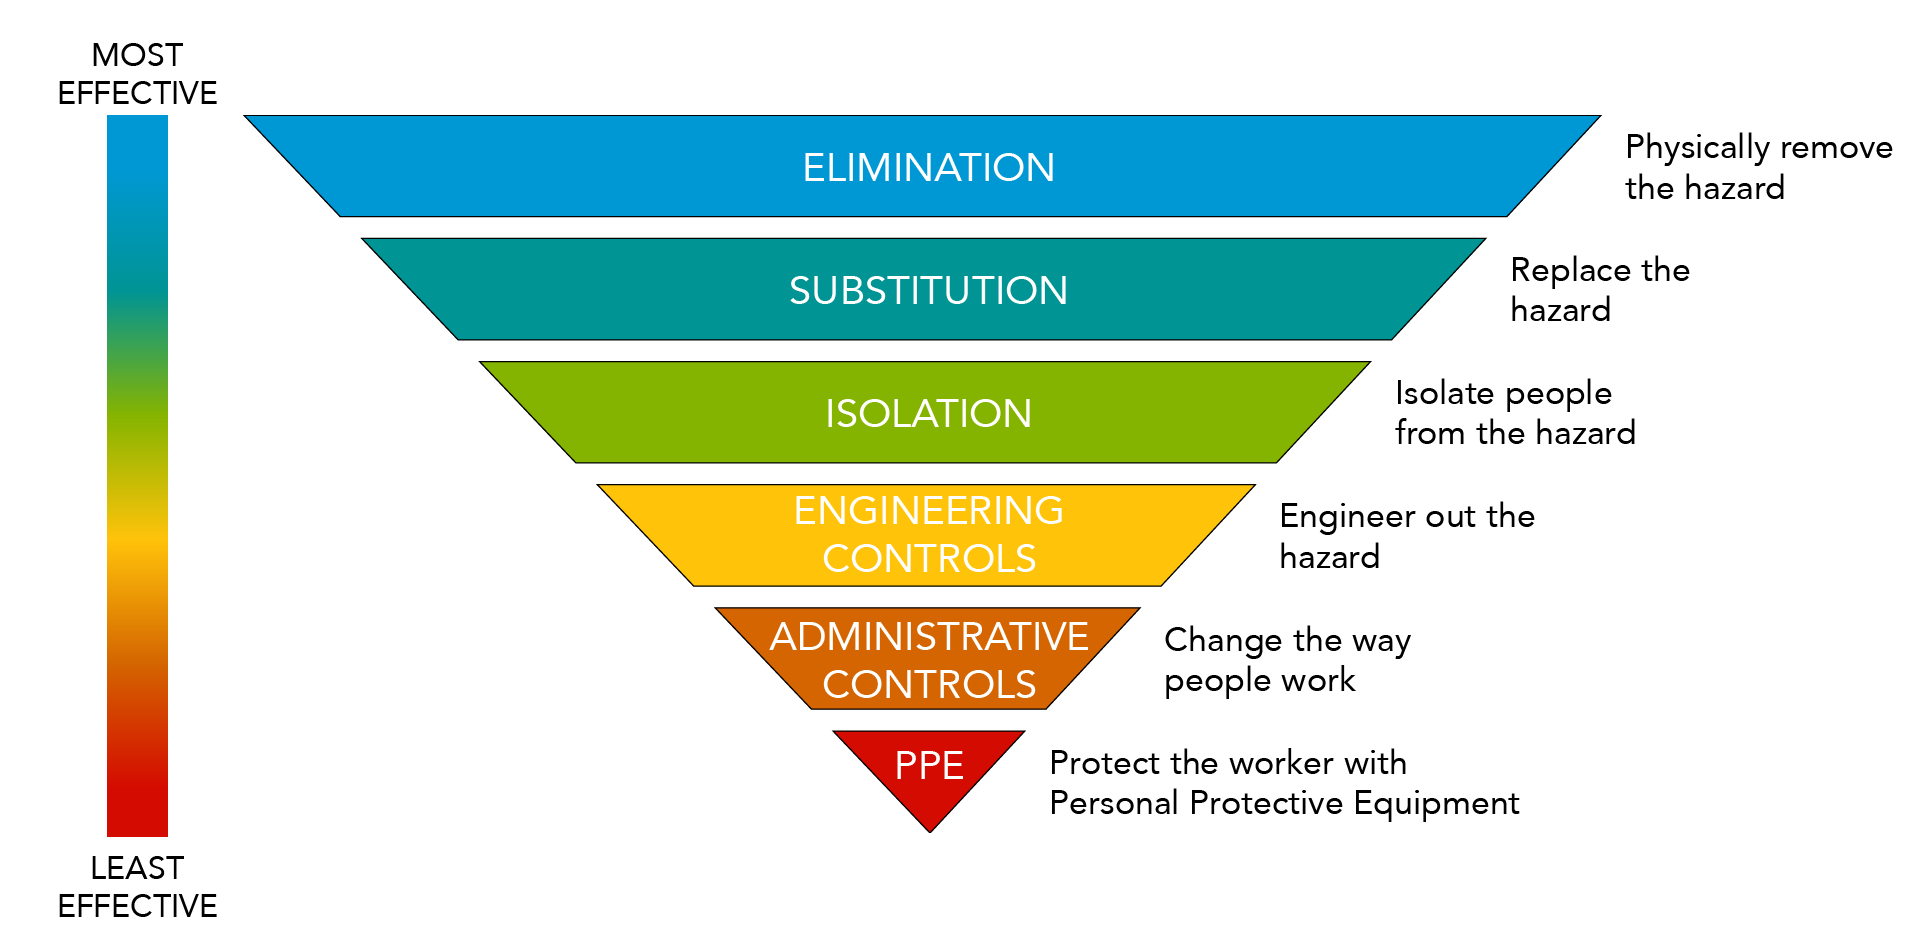
The diagram below shows what is referred to as the risk hierarchy.
The inverted triangle shows the actions you could take to reduce risk from the most effective at the
top, down to the least effective at the bottom of the triangle.
The idea is that you work down the hierarchy in an attempt to reduce the risk by using the highest possible method.
We identified the possible risk of someone falling down the stairs. We gave the likelihood a score of 3 out of a possible 5 and the severity a score of 4, giving an overall risk rating of 12. Let’s see how we can work through the risk hierarchy to reduce this risk.
Elimination
At the top of the hierarchy, we have elimination.
This means that you would remove the hazard altogether. This may not always be possible – imagine if you had identified the risk of falling down a flight of stairs in your office. We cannot remove the stairs, therefore we are unable to completely eliminate the risk. However, where possible, if we can remove the risk altogether, this is undeniably the most effective form of risk control.
Substitution
As we cannot take the stairs away, we need to go down to the next potential solution – substitution. Again, it would not be possible to substitute the stairs with an alternative method of vertical transportation.
Whilst we could install a lift, we would still need the stairs for evacuation or if the lift is out of order. So in this example, substitution is not the answer. However, it is the second most effective risk control after elimination and so always worth considering if possible.
Isolation
If we can’t eliminate or substitute the risk, we drop down to the next potential solution – isolation.
This would mean denying or restricting access to the area where we have identified the risk. In the example of the office stairs, this would mean preventing employees from using the stairs altogether. Again, not a practical solution.
Engineering Controls
The next level down would be to use engineering controls.
These usually apply to the use of machinery and include examples such as extraction machines to remove hazardous dust or fumes from the air, enclosing dangerous items of machinery or moving parts, or installing guardrails. So probably not useful in our stairs example.
Administrative Controls
Our next option would be to use administrative controls. That is, getting people to change the way they work or act. Now we have a viable solution.
We could insist that people using the stairs must hold onto the banister as one example, so they can only carry items in one hand, with the other being free at all times to hold onto the banister.
We could also insist that they always stick to the left hand side, so people who are ascending will never collide with those who are descending.
Insisting on these actions would reduce the likelihood of someone falling down the stairs. With these risk controls in place, we can now reassess the risk rating.
We might say that the likelihood of someone falling has now reduced to 1. However, should someone fall, the severity would remain the same. Our risk rating now would be 1 x 4 = 4.
If you look at the risk matrix, you can see that this risk rating falls at the bottom end of the yellow category. Given that we cannot remove the risk altogether, this would be classed as acceptable.
You’re not expected to eliminate all risks, but you do need to do everything reasonably practicable to protect people from harm.
This means balancing the level of risk against the measures needed to control the real risk in terms of money, time or trouble.
A final note to explain the hierarchical nature of the risk controls…
The reason that admin controls and the wearing of personal protective equipment are at the bottom of the hierarchy (i.e. the least preferable options) is that they both rely on people to act in an appropriate way. This can be difficult to enforce and you cannot always rely on people to do as they are told.
Personal Protective Equipment (PPE)
It is worth noting that the use of PPE is probably the only control that will result in a reduction of the severity of an injury should an accident happen.
With this in mind, it is often worth combining PPE with one of the other parts of the hierarchy in order to reduce both the likelihood and the severity of the risk.
Clearly this isn’t always possible (you wouldn’t expect people to don PPE whenever they take the stairs!) but where reasonable it can be an effective way of reducing risk.
Documentation, Documentation, Documentation (and review)…
Recording the fm risk assessment
Step four of our process requires us to record the results.
To do this, we need to use a risk assessment form.
Remember, an organisation with more than 5 employees is legally required to write down their risk assessments, but even if you work for a smaller company it is advisable to do so anyway.
Different organisations use different types of form. And for the most part, all are acceptable. However, the IOSH form (a copy of which you can see below), is recommended because it forces you to use the five step process.
You can download a copy here.
The first thing we record are any hazards and the people who might be affected. This is step one. For example, we have identified the stairs as a hazard, with all staff and visitors identified as being at risk.
We then consider the potential consequences should the risk be realized under any current controls we already have in place and calculate the level of risk using the risk formula or risk matrix that we have discussed previously. This is step two.
Next, we identify and record any new controls we can introduce to try and reduce the risk even further. This is where we use the risk control hierarchy from last week’s issue.
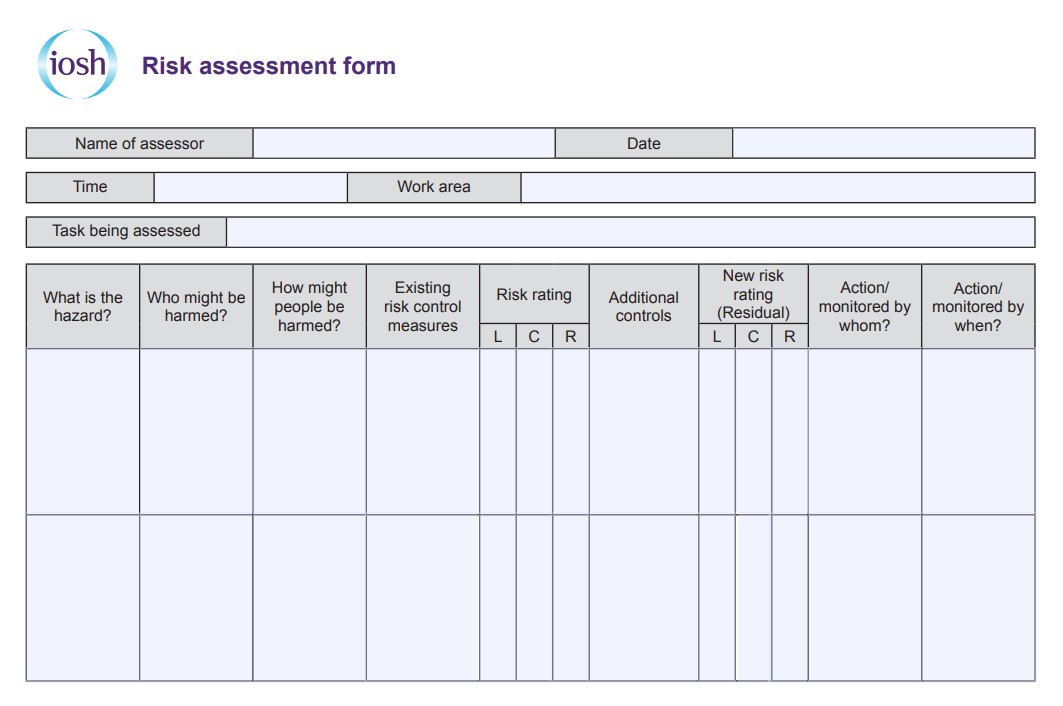
Then, once we have implemented the risk controls, we need to recalculate the risk. This is known as residual risk, and unless you can use elimination (the first step on the hierarchy) there will always likely be some level of residual risk. Documenting the risk controls and calculating the residual risk is step three.
Step four, then, is exactly what you are doing here – recording the results of your risk assessment. So filling in this form is in itself sufficient to complete step 4.
Finally we record who will be responsible for ensuring that the controls are implemented and by when. This is step five, which we will consider now.
Keep a watchful eye…
Reviewing the risk assessment
Undertaking a risk assessment is a useful exercise to mitigate any risks that you have identified in your workplace. However it may not last forever. Therefore, Step 5 of the process is to regularly review the controls you have put in place to make sure they are working.
You should also review them if:
- they may no longer be effective
- there are changes in the workplace that could lead to new risks such as changes to:
– staff
– a process
– the substances or equipment used
Also consider a review if your workers have spotted any problems or there have been any accidents or near misses. It may also be that there have been changes or updates to the relevant legislation.
Once you have undertaken the review, you should update your risk assessment with any changes you make.
Want to find out more?
XenZone is a library of bitesize courses designed specifically for Facilities Managers.
It’s the only one of its kind in the world, offering unlimited access to an ever growing selection of interactive online courses for aspiring FMs.
You can try XenZone out for free today!
About the author

Chris Morris – Xenon Group Director
Chris has spent the past 15 years working in the field of Facilities Management training and qualifications, teaching facilities managers how to be the best they can be.
A strategist and creative thinker, Chris is also a former chair of the IWFM Rising FMs group, a contributor to Facilitate magazine and iFM.net and a firm believer in the value of identifying and developing the strengths of an organisation’s people.


